 This is a great way to quickly create a raised bed for gardening when you have less than perfect soil. If you have heavy clay soil, like many of us do in the southwest Washington state area, this is an especially useful method to set up your garden beds or plots. (It works for other soils, too, though!) Once you gather the materials, you can construct the “bed” and plant the same day!
This method has been introduced and rediscovered multiple times by different people all over the earth, within the last hundred years, and probably many times before, too! Known as “Lasagna Gardening”, “Sheet Composting” and “Layered Composting”, it has some great benefits: 1) no til, 2) no dig, 3) converts newspaper, kitchen & yard scraps into great soil, 4) sets up quickly and 5) since it results in a “raised bed” it warms up sooner and extends the growing season here in the Pacific Northwest, west of the Cascades.
So, what is Lasagna Gardening and how is it done? Instead of composting materials in a compost bin until they turn into soil, then moving that soil into your garden beds, with Lasagna Gardening you actually layer the composting materials right into the garden bed, in a series of different layers (like lasagna you eat is made up of many layers!), which begins to compost at the same time you are planting on the top layer of the new bed – seeds or transplants – the same day if you want!
The attached one page “summary” gives you a good head start on the basics of how to begin. Scan through it, along with this “primer”.
DETAILS:
In preparation to build your new lasagna bed, map out or mark out the area you wish to make the new bed first. Then, smooth or fill in the ground to get it fairly level. If you have weeds or tall grass, mow it or whack it over to lie flat. You do not have to dig out the grass before starting! (The cardboard/newspaper layers will smother the grass, plus, the rotting grass makes more good organic material for your bed’s base!)
Gather your materials to make your various layers. The amount of materials are dependent upon how big your bed will be and how deep you intend to make it. The “deeper” you make it, the better start your bed will have the first year.
See the attached document for ideas on what you might collect to put in your bed, or skip ahead to the “CARBON and NITROGEN” section (below) for additional ideas.
LAYERS
Be sure as you put down your layers that you THOROUGHLY DAMPEN each layer. Each layer should have the dampness of a well wrung out sponge.
Sub-layer for moles: If you have problems with moles, you may wish to put down a layer of hardware cloth (its actually wire material with about 1/2″ size squares) before putting down your very first lasagna layer of newspapers or cardboard – this will dissuade burrowing up through the ground into your new bed.
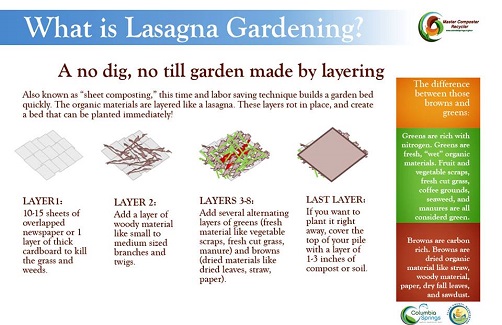
The first layer is cardboard or newspaper. The bottom newspaper or cardboard should be sodden – water them as you put them down, on both sides, otherwise the water will run off like tiles of a roof and not get the undersides wet, too. Insure they overlap each other so weeds can’t creep between the cardboard (or newspaper) and foil your fresh start.
The second layer is the twiggy/branch layer. It should be about 3″-8″ deep. Around here, what works very well are the little branches from Douglas Fir trees, maples and other small twiggy branched plants. The purpose of this layer is to provide a good “air layer” so that there is good air flow at the bottom so the bed does not get smelly. Don’t leave this layer out or you might have a stinky mess on your hands as the anaerobic bacteria will become dominant. You want good air flow at this layer to encourage the “good” aerobic bacteria to take up residence in your bed.
Subsequent alternating layers: then, alternate layers of nitrogen or carbon materials – make each distinct layer 3″-5″ deep, or so. It is desirable to build the overall depth of your bed as deep as you can – say 12″ to 18″ thick, or even 24″.
If you are to plant immediately, make your topmost or last layer be compost or good soil, at least 3-5″ deep. If you intend to overwinter this bed before planting it the first time, you should top it with straw or leaves to keep the soil from being washed away. You may top it with plastic to overwinter, but, be warned, it may dry out if you do so and the bacteria that do so much of the composting work, will slow way down without dampness.
CARBON and NITROGEN: One thing to keep in mind, you don’t want too much carbon or too much nitrogen when you are adding to your lasagna bed. But, how do you tell the “right proportions”? Well, a good “guesstimate” is to simply add, by volume, about equal amounts of nitrogen and carbon – for instance for a gallon of nitrogen add a gallon of carbon rich nutrients.
Nitrogen rich materials: fresh mown grass, coffee grounds, pulled weeds, somewhat aged animal manure (horse, sheep, llama, rabbit), kitchen scraps (peelings, rinds, fruit skins) .
Carbon rich materials: leaves, fir or pine needles & twigs, straw, newspaper, sawdust, fine bark. The carbon layers also add “fluff” to your bed so there are air pockets that allow the “good” bacteria to flourish. If your layers are too compressed, there will be little air, and you will get a sodden mess that smells sour – not good! So, layers of twiggy stuff like the small branches and twigs of Douglas firs are GOOD for a lasagna layer!
NOTE: I personally prefer using cardboard as the initial layer for my new beds, not newspaper, as it is tougher than newspaper and will stay put on a windy day. But, I have used very thick newspaper layers, as well. And, don’t limit yourself to just using this method when you lay out your initial new garden bed. You can continue to build up the existing bed(s) each year after harvest, by laying more layers onto your existing beds.
NOTE: Just be cautious with fresh chicken manure – you’ll want to go “lightly” with it as it is a very HIGH source of NITROGEN. Don’t treat it, by volume, as equal to less fresh manures or other nitrogen sources; you may need to treat it like it is 10x the NITROGEN content.
NOTE: Just don’t apply layers too deeply over perennials like asparagus or over-wintered plants like garlic – they might smother or be incapable of “climbing” out of the thick layers. Also, you don’t need to re-apply the cardboard/newspaper layer in subsequent years – its main purpose is to initially smother the weeds or lawn you built your bed upon.
READY TO START YET?
Still not sure you’re ready to start? There are many good resources to help answer any lingering questions you may still have. Here are some additional resources:
1) “Lasagna Gardening for Small Spaces” and “Lasagna Gardening” books by Patricia Lanza. First is available at the Fort Vancouver Regional Library and the second is for sale at many book stores. Check out Ms. Lanza’s blog at this location:
http://firstlasagnagardener.blogspot.com/
and her facebook page, too:
https://www.facebook.com/pages/Patricia-Lanza/204100295374
2) An amusing “comic book” on Lasagna Gardening put together by the Polk County (Oregon) Master Gardeners is available on line in .pdf (Adobe Reader) format. It is a fun, quick and educational read, too. (Remember, that you don’t need to wait a season as indicated in the comic book to plant if you put a top layer of a few inches of earth on the bed as the final “layer” – you can plant right away – BR.):
Click to access PCMG_Organic_No_Till_Gardening_Comic_Book.pdf
3) The Clark County (WA) Master Composter Recyclers usually offer class(es) on lasagna gardening every spring-fall season. Check their web site for the next lasagna gardening class (below). And they’ve posted many VIDEOS and SLIDES you can self-teach from, too! There are also other groups in Clark County that offer courses on Lasagna Gardening as well.
https://clarkcountycomposts.org/
4) Check out youtube and google for “lasagna gardening” or “sheet composting”. There are many different views on how to do this – just remember, use the materials that are available to YOU in YOUR area. In our area we have a lot of Douglas Fir bark & leaves & branches, Maple Tree leaves, and even coffee grounds. 🙂 You may also have friends who are happy to give you “poo” from their non-meat-eating animals, too.
15 Years of Successful Lasagna Gardening over Clay Soil!
I discovered lasagna gardening about 15 years ago and its the ONLY way I build new garden “beds”. We live at about 1000′ elevation amongst 100+ foot Douglas Firs. The ground is rock and clay, with a thin 1″-2″ layer of soil, covered w. a thin layer of Douglas Fir needles. Pretty awful stuff!
Yet, since using the lasagna gardening method, my beds are easy to weed and require very little work to establish. The plants do well and taste wonderful! Best of all, no digging and no tilling and mostly cheap amendments available from our area and our kitchen!
In spring, I lightly weed the beds. In fall or even early spring, I apply new layers to existing beds – mostly maple leaves run thru our mulching lawnmower, twigs & needles fallen from our many Doug fir trees, kitchen scraps during the entire year, and the compost from our 3 bin compost bins. Lastly, in fall, I scatter a light layer of straw (not hay – hay has seeds that turn into grassy weeds!) over my beds so they don’t get washed away in the winter rains. That’s it!
Have fun!
– BR
[Image: Master Composter Recyclers of Clark County, WA, USA]

I’m concerned about using this method without building a raised bed to put it in. I live at 7200′ on top of a rather windy mountain with no wind breaks. Would I get the same results in a raised bed?
Lasagna gardening can be used anywhere; adaptations can be made for special needs. High winds can be a challenge for any gardener, especially a lasagna garden bed with light materials like leaves layered in it. In your case, I would probably tend to put a deeper layer of soil on the top, which hopefully, will not be blown away and hold the lighter materials in place. If that isn’t effective, you may indeed have to resort to putting a higher ‘trim’ around the edge of the bed – planks of wood or concrete blocks for instance – to try to reduce the materials “leaving” the bed on the winds! If your winds are that fierce, you may need to create some sort of windbreak around your gardening area no matter whether you use raised or un-raised beds. You might do this by planting “permanent” perennial bushes around the edge of the entire garden area to slow the winds down, or even solid fencing. Good luck! High winds are no fun!
Do you gather all of the materials, then put tne beds together? Just wondering how to keep critters away while working on the food scrap layers.
We typically do gather all the materials and then put the beds together. If you have more food scraps to add later, you can simply dig a hole (open it with your hands) and then stuff the scraps in the hole and cover it back up. This won’t deter some creatures like raccoons, but, they generally won’t dig for vegetable or fruit scraps, just meat type items, which we don’t suggest you put in your compost or garden beds anyway.
You can either doi it all in “one go” at once, or do it over time. It really doesn’t matter. Some critters might show up, particularly raccoons, but, usually, once it is covered thoroughly with “non-edible” items, the bigger creatures don’t mess with it much. Limiting how many table scraps you use is a good idea then.